Creating a Pattern
Before You Start
The Scanned Document Processor service must be running to enable scanned documents to be processed. See Service Settings for information about how to start this service.
The Transform Client Plug-In must be installed to view the scanned document and edit a pattern.
To submit a sample scanned document for use in the following examples, it is necessary for a branch file developer to create and run a branch that uses the OCR Store Scanned Document object to submit a sample file to the OCR engine for scanning. The following examples use the sample invoice file, <root>\DOL.fsr\DOL\help\Sample_Invoice.pdf.
The branch can be configured in any of the following ways:
- To submit the sample document for use as a template when first configuring a scanning category, specify a value of Pattern_Requests for the Category child of the OCR Store Scanned Document object so that the document is stored in the Pattern_Requests category.
- To submit the sample document to be compared with any existing patterns or Index searches, do not specify a value for the Category child. If the sample document does not match any patterns or Index searches, it is stored in the Unmatched_Scans category.
- To store the sample document in an existing scanning category, specify the name of the category (for example, OCR_Demo) as the value of the Category child.
Starting the Pattern Editing Application
The route to the pattern editing application depends on the history of the document to be used as a template:
-
A branch submits the document to the Pattern_Requests category (for example, so that it can be used to create a pattern for a new scanning category).
A user with All including inbox permissions to the Pattern_Requests category can then open the document, if necessary move it to the category to be associated with the pattern (as described in Correcting Index Values), and then click the Edit Pattern button (
 ).
).The user must have Upload documents permission to the category to be associated with the pattern.
-
A user checks the index values in a document, and then selects Add Pattern before clicking Finish.
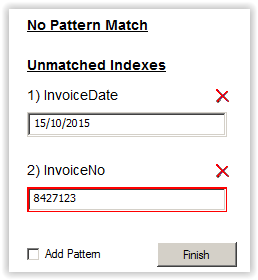
A user with All including inbox permissions to the Pattern_Requests category can then open a copy of the document and click the Edit Pattern button (
). - A user opens a document for index correction, and then clicks the Edit Pattern button ().
Creating a Pattern
When you click the Edit Pattern button () to open the pattern editing application, the page displays the controls for creating or editing a pattern, and the left pane displays the following buttons:
- Index Data, used to locate the data to be extracted from the page.
- Identify Pattern, used to identify the page type.

By default, the controls for Index Data are displayed first.
For each normal index associated with the category, a red box is displayed as an overlay on the scanned image, and labeled with the name of the index.
In the example shown, boxes are displayed for the Invoice Date and the Invoice Number indexes created as described in Creating a Scanning Category.
To create a pattern:
-
Drag and resize the red overlay boxes so that they enclose the area containing the relevant data.
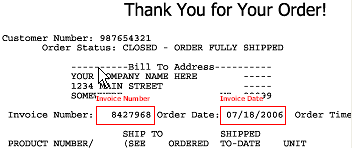
This is an example of static text on a page. Every time this pattern is matched, it extracts the data at these two locations for the category's two index fields.
-
Click Identify Pattern.
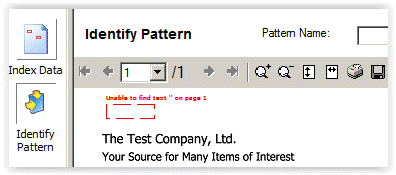
Identify Pattern provides a single box named Anchor. Drag and resize this box to surround text that appears in the same position on this type of document but not on any other documents.
In this example, the pattern is to identify invoices from a specific supplier. Position the box around the name of the supplier, as shown below.

Whenever this text appears on this position on a page, the pattern will match.
-
Enter a Pattern Name.

- Click Finish to save the pattern.
- A dialog appears, asking whether you wish to check the pattern against existing samples. Click No.
Testing the Pattern
Scanned documents of the same format as the template document should match the pattern and be assigned to the associated category.
To test the pattern, resubmit the sample document for processing. If the pattern is configured correctly, the document appears in the OCR_Demo category.
When you open the document, blue overlay boxes show the data elements that have been extracted as the index values for the document. Options are available for changing the index values and for editing the pattern.
Tidying Up
After a pattern has been created, the document remains in the Pattern_Requests category. We recommend that when you have finished creating a pattern, you delete the document from Pattern_Requests.
|
Note For information about the keyboard actions that are available when you view a document that uses the Transform client plug-in feature, see OCR Keyboard Shortcuts. |